It's not uncommon that developers cut the last bit of bloatware and scamsoft out of theire ROMs to ensure maximum stability and smoothness - but they also just want to save pure space. The calculation is easy: As less useless data that annoyes the system is there as more performance you gain (usually).
Some developers are kinda overdoing in their love for slicking. They just cut out (and don't provide an alternative) any kind of (root)filemanager. This can make it hard for the common user to install his apps after a clean installation of a ROM. As far as I have seen, most developers provide some kind of Terminal Emulator. In the following I shall show you how to make use of it and install your apps via bash in terminal.
Preamble:
(Please note that it's your own responsibility to proceed further.
I can't come up for damages and can't always be there with personal advice.
The tutorial may be made on and for TF101 but should work on other devices
and versions too. Be careful. You pay what you destroy!)
In this tutorial I will focus on Terminal Emulator which is given in most of Timdurus latest ROM releases (to be mentioned that Terminal IDE & Co should do fine too...). If you don't have any emulator / IDE you can get
 Terminal Emulator and
  Terminal IDE from Play Store.
Good meant advice to remember before we start: This whole process is somewhat unix based. So all commands that we will perform are case sensitive. The command "./sh" means something different then the command "./SH". You will enter a folder by entering "cd /foldername/" but will fail with "CD /foldername/" as you would fail with "cd /folDername/". So watch your typing...
Now open the Terminal Emulator so we can test some commands and parameters. It should look something like this:
First Steps
Lets do some minor configuration. Especially when using a touchscreen as input this is neccessary.
Tab there to open the settings:

Then go for:

and chose:

We are done. But have we done? This setting means, when u push the back software button the app won't go a step back or close but instead it will simulate the "[TAB]" key. The alternative would be to push [VOLUME UP] + [T] (standard) to simulate [TAB]. No matter what way you decide for remember: [BACK]-keys or [VOLUME UP] + [T] = autofill. This is essencial ecspecially
if you are using a touchscreen to type. Linux / Android is not short
sentenced. Autofill? [TAB]? :)
Let's get into this!
Autofill
Lazy? Unsure how to spell a filename or folder? No problem. Autofill brings the solution.
Example: If you want to enter a folder named "/xyzSAKDJASKJDKA/" but don't want to type it all the way, then you just enter "cd /xyz" then you hit [BACK] or [VOLUME UP] + [T]. That should be all we need for now together with some more commands as the following: "cd" and "ls" we are almost ready to go.
Find out your location:
You are in: /u0_a47@tf101/ this means you are the user u0_a47 at device tf101. Your location is "/". To speak out easy: "/" is compareable to "C:\" under DOS or Windows based systems. Back to topic. Remember? We are still here:
Basic Commands:
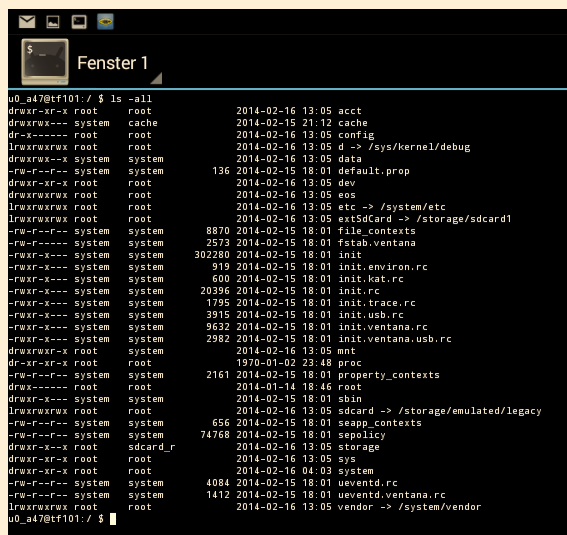
Lets have a look where we are and what files are around. Type: "ls -all"

Aha! This is the very root of our filesystem. Comparable to C:\ on Dos / Windows. Now lets install an app from the external sdcard. How? Answer: We need a comand to move our position. This would be "cd"
You can enter a folder by the cd command or change to one level above. Some might know this from Linux or DOS related operating systems. Remember: This command work from where you are. So we are in root and want to access files on our sdcard. OFC we know, our external sdcard is mounten to "/extSdCard/".
(Mounted means the system links the physical position and connection of a drive or whatever to a virtually place in the filesystem. While Windows works like Okay I got a "drive c:", a "folder a" on it and a file named b.txt on it. Relative windows systempath = "c:\a\b.txt". So linux doesn't care too much where the file is. It says: "I got my virtual drive here... it's called root" to access a physical drive like "c:\" I will just link "c:\" to "/". Hope this makes things a bit clearer. Also see Wikipedia for further imformation on mounting.
So lets move on to the external SD by typing: "cd /extSdCard/"
(In my case ill move on to (/extSdCard/Android/Pad Neu/APKs/)

Installing an application
Lets install an application! First we need to get super user rights. This means our tablet need to know, that we are the master! To let it know type: "su"
Your tablet will answer with something like:

Now we can proceed playing god. For now we install a version of the exposed framework. Our position now has to be the same as the *.apk. In my case: "/extSdCard/Android/Pad Neu/APKs/".
Here comes the magic: "pm install yourAPKfilename.apk"
(in my case its de.robv.android.xposed.installer_v25_36_cbbc.apk or something like that)

The installer will prompt when done.
Congratulations. You successfully installed an app via Terminal Emulator and some android / linux bash commands.
Keine Kommentare:
Kommentar veröffentlichen